
Before technologies like Spark or cloud data lakes took over, Apache Hadoop laid the foundation for the big data revolution. It introduced the world to an open-source framework capable of storing and processing massive datasets across clusters of commodity hardware.
Even today, understanding Hadoop’s underlying infrastructure is a rite of passage for data engineers.
In this architectural guide, we will break down Hadoop’s node topology and walk through the step-by-step configuration required to stand up a functional Multi-Node Hadoop Cluster using a primary orchestrator (Master) and a compute instance (Worker).
🏗️ The Multi-Node Cluster Architecture
Hadoop scales horizontally using two primary structural layers: HDFS (Hadoop Distributed File System) for storage, and YARN (Yet Another Resource Negotiator) for compute cluster management.
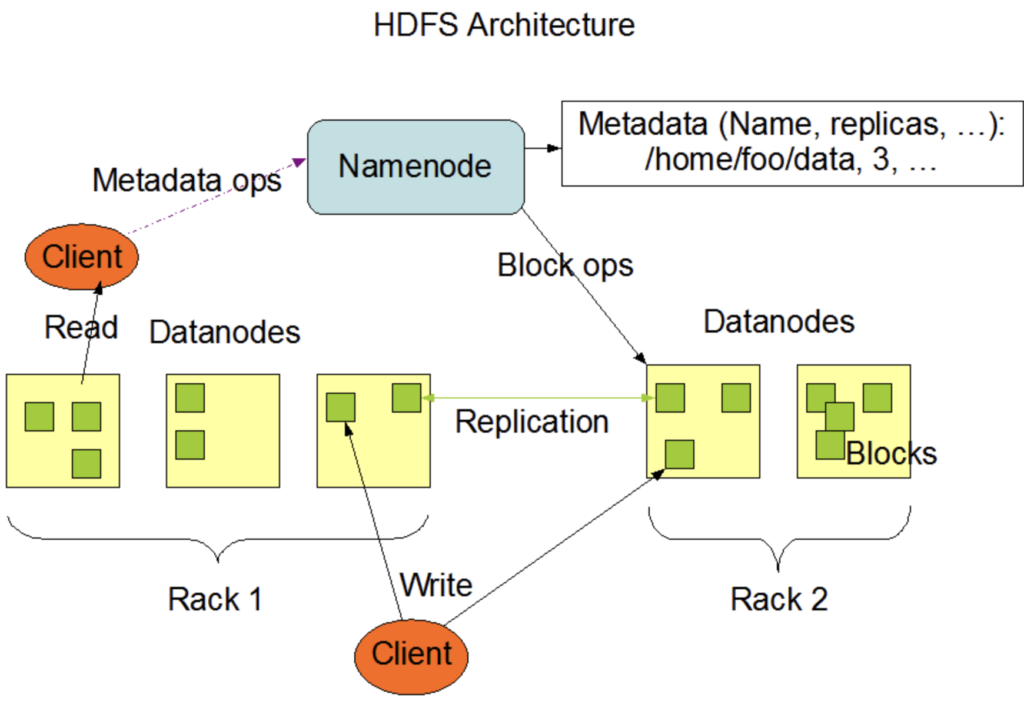
Hadoop HDFS cluster architecture NameNode DataNode architecture diagram. Source: hadoop.apache.org
- The Master Node (Orchestration): Runs the NameNode (the directory bookkeeper that tracks where file blocks live across the cluster) and the ResourceManager (the arbiter that allocates computing resources to running jobs).
- The Worker Nodes (Execution): Run the DataNode (which physically writes file blocks to local hard drives) and the NodeManager (which executes computational tasks under YARN’s direction).
🛠️ Step 1: Network & System Prerequisites
For a multi-node cluster, your machines must communicate seamlessly. Execute these system steps on both the Master and Worker servers.
1. Configure the Hosts File
Ensure your servers can resolve each other by name rather than shifting IP addresses. Edit /etc/hosts:
Bash
sudo nano /etc/hosts
Add the private IP mappings of your infrastructure:
Plaintext
192.168.1.50  hadoop-master
192.168.1.51  hadoop-worker1
2. Configure Passwordless SSH
The Master node must be able to securely log into Worker nodes to spin up execution daemons automatically.
On the Master Node, generate an SSH key and copy it over to the worker:
Bash
ssh-keygen -t rsa -P "" -f ~/.ssh/id_rsa
ssh-copy-id hadoop-worker1
Verify the security handshake by running ssh hadoop-worker1 from your master terminal. You should slide right in without typing a password.
3. Install Java Environment
Hadoop is built on Java, demanding a stable Java Development Kit (JDK 8 or 11):
Bash
sudo apt update
sudo apt install openjdk-8-jdk -y
🛠️ Step 2: Download & Extract Hadoop
Execute these steps on the Master Node first:
- Download a stable Hadoop release tarball (e.g., version 3.x) from the Apache Hadoop Official Releases.
- Unpack the compressed payload and drop it into an enterprise directory path like
/opt/hadoop. - Append these environment pathways to your local system user profile (
~/.bashrc):
Bash
export HADOOP_HOME=/opt/hadoop
export HADOOP_INSTALL=$HADOOP_HOME
export HADOOP_MAPRED_HOME=$HADOOP_HOME
export HADOOP_COMMON_HOME=$HADOOP_HOME
export HADOOP_HDFS_HOME=$HADOOP_HOME
export YARN_HOME=$HADOOP_HOME
export HADOOP_COMMON_LIB_NATIVE_DIR=$HADOOP_HOME/lib/native
export PATH=$PATH:$HADOOP_HOME/sbin:$HADOOP_HOME/bin
export JAVA_HOME=/usr/lib/jvm/java-8-openjdk-amd64
Run source ~/.bashrc to update your current terminal session context.
🛠️ Step 3: Modifying Configuration Xml Files
All configuration scripts reside inside the $HADOOP_HOME/etc/hadoop/ directory on your Master Node.
1. hadoop-env.sh
Explicitly define the Java runtime path inside the environment shell script:
Bash
export JAVA_HOME=/usr/lib/jvm/java-8-openjdk-amd64
2. core-site.xml
Define the structural URI location of your central NameNode coordinator:
XML
<configuration>
    <property>
        <name>fs.defaultFS</name>
        <value>hdfs://hadoop-master:9000</value>
    </property>
</configuration>
3. hdfs-site.xml
Configure how many times file blocks should replicate across your data nodes. Since we have one master and one worker node, set the value to 2:
XML
<configuration>
    <property>
        <name>dfs.replication</name>
        <value>2</value>
    </property>
    <property>
        <name>dfs.namenode.name.dir</name>
        <value>file:///opt/hadoop/data/hdfs/namenode</value>
    </property>
    <property>
        <name>dfs.datanode.data.dir</name>
        <value>file:///opt/hadoop/data/hdfs/datanode</value>
    </property>
</configuration>
4. yarn-site.xml
Configure YARN to run as the primary computation manager:
XML
<configuration>
    <property>
        <name>yarn.nodemanager.aux-services</name>
        <value>mapreduce_shuffle</value>
    </property>
    <property>
        <name>yarn.resourcemanager.hostname</name>
        <value>hadoop-master</value>
    </property>
</configuration>
5. Define the Workers List
Open the configuration file named workers and list the hostnames of your execution machines:
Plaintext
hadoop-master
hadoop-worker1
🛠️ Step 4: Sync Configurations to Worker Nodes
Rather than rewriting all these XML files manually on every single worker instance in your server rack, securely copy your pre-configured, local Hadoop tree across the network fabric using rsync from your master node:
Bash
rsync -avz /opt/hadoop hadoop-worker1:/opt/
(Ensure the destination path user permissions match exactly on the receiving machine).
🛠️ Step 5: Formatting and Starting the Cluster
Everything is configured. Now, we initialize the HDFS filesystem directory structure and boot up the cluster network.
1. Format the NameNode File System
Execute this command only once on your Master Node before launching the cluster for the first time. Warning: running this on an active production cluster wipes out metadata structural tables.
Bash
hdfs namenode -format
2. Fire Up HDFS Daemons
Launch the master file system tracker and worker data collectors:
Bash
start-dfs.sh
3. Fire Up YARN Compute Daemons
Launch the processing resource allocations across the cluster fabric:
Bash
start-yarn.sh
🔍 Step 6: Verifying Cluster Health
Open your terminal and execute jps (Java Virtual Machine Process Status Tool) on both servers to see the active daemons:
- On
hadoop-master, you should see:NameNode,SecondaryNameNode, andResourceManager. - On
hadoop-worker1, you should see:DataNodeandNodeManager.
The Web Interface Check
Open your browser to visually inspect the state of your infrastructure:
- HDFS Storage Panel:
http://hadoop-master:9870 - YARN Cluster Dashboard:
http://hadoop-master:8088
You now have a production-topology, distributed big data foundation up and running natively!