
When your data footprint grows from megabytes to terabytes, traditional tools like pandas hit a wall. They operate entirely in single-node memory, leading to the dreaded OutOfMemoryError.
To process big data at scale, you need a distributed processing engine. Apache Spark is the open-source industry standard for distributed cluster computing, allowing you to split massive computational jobs across tens, hundreds, or thousands of machines in parallel.
In this guide, we will break down the structural architecture of a Spark cluster, stand up a local Standalone Master/Worker network, and write a parallelized data processing script using PySpark.
🏗️ The Spark Cluster Architecture
Spark operates on a master-worker topology controlled by a centralized coordination program called the Driver.
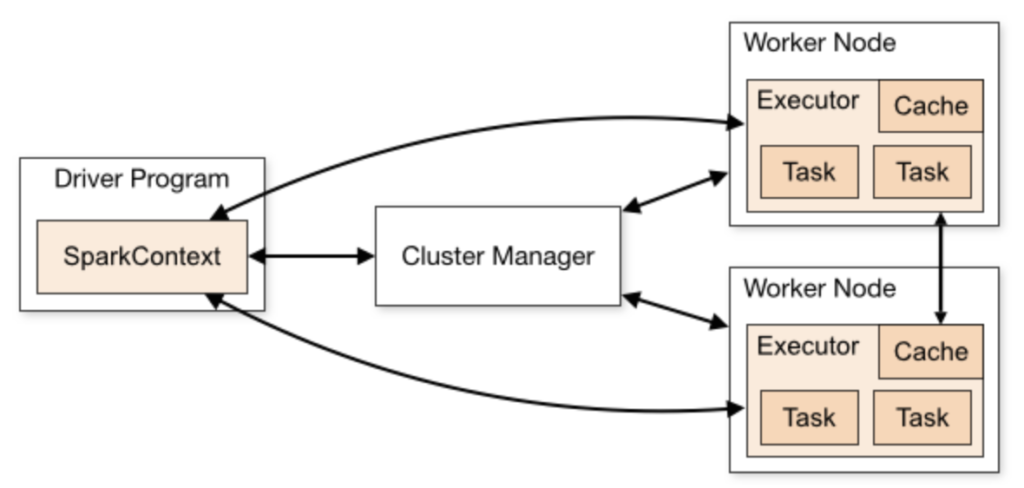
Apache Spark cluster architecture master worker driver executor. Source: medium.com
- The Driver Program: The heart of your application. It runs the main code, creates the computational blueprint (DAG), and manages the allocation of tasks.
- Cluster Manager / Master: The orchestrator. In a Standalone setup, the Master node monitors the health of the infrastructure and allocates resources across the available servers.
- Worker Nodes & Executors: The workhorses. Workers are the physical machines or containers in your network. Each worker spawns an Executor process, which is an isolated JVM instance that receives tasks from the driver, executes them in parallel threads, and stores data fragments in RAM or disk cache.
🛠️ Step 1: Install Pre-requisites
Spark runs on the Java Virtual Machine (JVM). Therefore, all machines in your network must have a compatible version of Java installed.
- Install Java JDK 8, 11, or 17 (Java 17 is highly recommended for modern Spark versions):Bash
# On Ubuntu/Debian sudo apt update sudo apt install openjdk-17-jdk -y - Download Apache Spark: Visit the Apache Spark Downloads Page, grab the pre-compiled package with Apache Hadoop, extract it, and move it to your preferred directory (e.g.,
/opt/spark). - Set Environment Variables: Add these paths to your
~/.bashrcor~/.zshrcprofile:Bashexport SPARK_HOME=/opt/spark export PATH=$PATH:$SPARK_HOME/bin:$SPARK_HOME/sbin
🛠️ Step 2: Set Up the Master and Workers Natively
In a production cluster, you would execute these scripts across different host servers. For local simulation, we can run them on a single machine to observe the network distribution layers.
1. Spin Up the Master Node
Execute this command on your primary orchestration machine:
Bash
start-master.sh
This boots up the master daemon. Open your web browser and navigate to the native Spark Web UI: http://localhost:8080. Take note of the official Spark Master URL listed at the top (it looks like spark://hostname:7077).
2. Spin Up Worker Nodes
On any machine that you want to contribute compute power to the network, spin up a worker daemon by explicitly pointing it to the Master URL:
Bash
start-worker.sh spark://<MASTER_HOSTNAME>:7077
Refresh your browser window at http://localhost:8080. You will see the new worker dynamically populate under the “Workers” table, displaying its allocated CPU cores and total RAM.
To gracefully stop your infrastructure later, run stop-worker.sh and stop-master.sh respectively.
🛠️ Step 3: Writing Distributed PySpark Pipelines
Now that your cluster infrastructure is live, let’s write a Python script that connects to it, reads a dataset, processes token logs in parallel, and saves the output.
1. Install PySpark
Install the Python bindings for Spark on your driver machine:
Bash
pip install pyspark
2. The Code Implementation
Create a script named spark_job.py:
Python
from pyspark.sql import SparkSession
from pyspark.sql.functions import col, split, explode, lower

# 1. Initialize the SparkSession and connect to your Standalone Cluster
spark = SparkSession.builder \
    .appName("DistributedLogAnalyzer") \
    .master("spark://localhost:7077") \
    .config("spark.executor.memory", "2g") \
    .config("spark.executor.cores", "2") \
    .getOrCreate()

print("⚡ Connected to Spark Standalone Cluster successfully!")

# 2. Simulate or read a big text dataset (e.g., system server logs)
log_data = [
    ("ERROR: Database connection timeout out after 30s"),
    ("INFO: User login successful for session 8421"),
    ("WARN: High memory usage detected on worker node 2"),
    ("ERROR: Failed to write to disk cache path"),
    ("INFO: Garbage collection completed successfully")
]

# Convert the raw list array into a distributed Spark DataFrame
df = spark.createDataFrame([(line,) for line in log_data], ["log_line"])

# 3. Distributed Processing Pipeline
# Split sentences into words, flatten the rows, convert to lowercase, and filter errors
words_df = df.select(explode(split(col("log_line"), " ")).alias("word"))
processed_df = words_df.select(lower(col("word")).alias("clean_word"))
error_words = processed_df.filter(col("clean_word").contains("error"))

# 4. Action: Count occurrences (This pushes tasks down to Executors)
error_count = error_words.count()

print(f"📊 Total 'error' log tokens found across workers: {error_count}")

# 5. Shut down the driver context connection gracefully
spark.stop()
📈 Top Spark Optimization Principles
Writing code in Spark requires a shift in how you think about memory. Keep these core design strategies in mind:
- Understand Transformations vs. Actions: Spark operations are completely lazy. Transformations (like
select(),filter(),map()) do not execute instantly; they just build an execution plan (DAG). The actual data processing clusters only kick into gear when you call an Action (likecount(),collect(), orwrite()). - Avoid
collect()on Massive Sets: Calling.collect()forces Spark to pull the entire distributed dataset from all worker nodes and compress it into the single memory thread of your driver program. If the dataset is larger than your local laptop’s RAM, the driver will instantly crash. Always write data outputs directly to distributed storage targets like S3 or HDFS. - Minimize Shuffling: Operations like
.groupBy()or.join()force data partitions to travel across physical network cards between different worker nodes (shuffling). Network I/O is expensive—design your pipelines to filter out unnecessary data early before triggering wide dependencies.