In modern data engineering, data pipelines rarely consist of a single script. A typical workflow involves extracting data from an API, loading it into a cloud data lake, transforming it via a data warehouse, and finally triggering a machine learning inference model.
If any stage fails, you need retries, dependency management, and clear error monitoring.
Apache Airflow is the open-source industry standard for workflow orchestration. It allows you to author, schedule, and monitor complex workflows programmatically as Python code using Directed Acyclic Graphs (DAGs).
In this guide, we will break down the structural architecture of Airflow, deploy a full-scale instance locally using Docker Compose, and execute your first automated pipeline.
🏗️ The Core Airflow Architecture
Airflow is not a single database or monolithic application. It is a distributed ecosystem made of several decoupled microservices that collaborate to run your code:
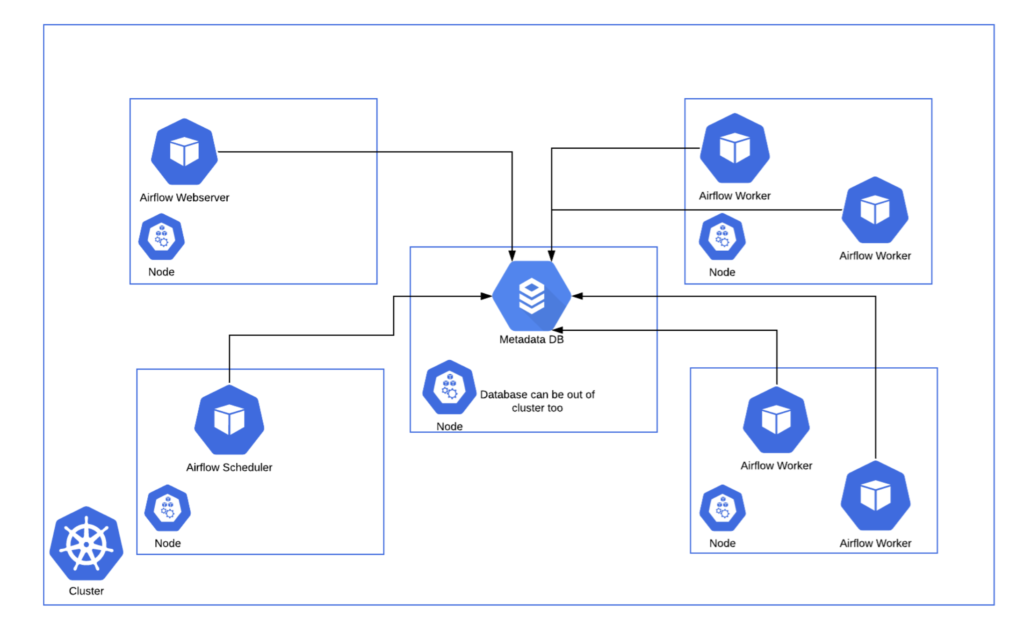
Apache Airflow architecture webserver scheduler worker flower metadatabase. Source: airflow.apache.org
- The Webserver: The user interface. A clean, interactive flask app that lets you trigger DAGs, debug execution logs, manage connections, and audit pipeline histories.
- The Scheduler: The engine room. A continuous background service that parses your Python DAG files, checks schedules, and orchestrates tasks by handing them off to the queue.
- The Executor & Workers: The muscle. The Executor defines how tasks get run (e.g., sequentially or distributed). In a standard production layout using the
CeleryExecutor, the executor passes tasks to a Redis queue, and independent Worker daemons pull those tasks to run them. - The Metadata Database: The brain. A central database (typically PostgreSQL) that stores the state of every task, user configuration, and historical DAG run log.
🛠️ Step 1: Initialize the Airflow Docker Architecture
The easiest and most reliable way to run a multi-component stack like Airflow is using Docker Compose. Airflow provides an official, pre-configured docker-compose.yaml file that sets up PostgreSQL, Redis, the Webserver, the Scheduler, and a Worker out of the box.
1. Fetch the Official Compose Manifest
Create an empty project folder and download the production compose layout template:
Bash
mkdir airflow-docker && cd airflow-docker

# Download the official docker-compose file
curl -LfO 'https://airflow.apache.org/docs/apache-airflow/stable/docker-compose.yaml'
2. Create the Directory Tree
Airflow expects specific folders to match local storage mount points inside the container volumes. Create them in your root directory:
Bash
mkdir -p ./dags ./logs ./plugins ./config
3. Initialize the Environment & Database
Airflow needs to run structural SQL schemas inside the PostgreSQL database before accepting jobs. Configure the current user ID permissions and run the database init command:
Bash
# Set up default environment user configuration mapping
echo -e "AIRFLOW_UID=$(id -u)" > .env

# Run the database initialization container
docker compose up airflow-init
Once the screen reads User 'airflow' created with role 'Admin', your database layer is ready.
🛠️ Step 2: Spin Up the Infrastructure
Launch the full distributed architecture in background detached mode:
Bash
docker compose up -d
Verify that all systems are operational by checking the process statuses:
Bash
docker compose ps
Accessing the UI
Open your browser and navigate to http://localhost:8080. Log in using the default secure development credentials:
- Username:
airflow - Password:
airflow
🛠️ Step 3: Authoring a Sample DAG Pipeline
An Airflow pipeline is written as pure Python, where tasks are defined using Operators. Let’s build a workflow that simulates an ETL task pipeline.
Create a file named sample_etl.py inside your local ./dags directory:
Python
from datetime import datetime, timedelta
from airflow import DAG
from airflow.operators.bash import BashOperator
from airflow.operators.python import PythonOperator

# 1. Define core Python functions for business logic
def extract_data():
    print("📥 Extracting data from third-party API gateway...")
    return {"status": "success", "records": 150}

def transform_data(**context):
    # Retrieve structural metadata passed from the extraction step if needed
    print("⚙️ Cleaning records and mapping columns...")

# 2. Define default arguments for the DAG lifecycle
default_args = {
    'owner': 'airflow',
    'depends_on_past': False,
    'email_on_failure': False,
    'email_on_retry': False,
    'retries': 1,
    'retry_delay': timedelta(minutes=5),
}

# 3. Instantiate the DAG object context manager
with DAG(
    dag_id='company_sample_etl',
    default_args=default_args,
    description='A clean sample ETL pipeline demonstrating Docker orchestration.',
    schedule_interval=timedelta(days=1), # Runs once every day automatically
    start_date=datetime(2026, 1, 1),      # Historical baseline start gate
    catchup=False,                       # Don't backfill historical missing days
    tags=['production', 'etl'],
) as dag:

    # Task 1: Use a BashOperator to run terminal system commands
    start_pipeline = BashOperator(
        task_id='print_start_timestamp',
        bash_command='echo "Pipeline triggered at $(date)"'
    )

    # Task 2: Use a PythonOperator to invoke modular python functions
    extract_task = PythonOperator(
        task_id='extract_api_payload',
        python_callable=extract_data
    )

    # Task 3: Transform step running parallel
    transform_task = PythonOperator(
        task_id='transform_payload_metrics',
        python_callable=transform_data
    )

    # Task 4: Final confirmation check
    end_pipeline = BashOperator(
        task_id='pipeline_complete_signal',
        bash_command='echo "Pipeline completed successfully!"'
    )

    # 4. Set Task Dependencies (The structural execution graph mapping)
    start_pipeline >> extract_task >> transform_task >> end_pipeline
🚀 Step 4: Run and Monitor Your DAG
Because you placed the file in the mounted ./dags directory, Airflow’s background scheduler will automatically parse the file within a few seconds.
- Refresh your Airflow Web UI home dashboard. Look for the
company_sample_etlID inside the DAG list. - Click the toggle switch on the left side of the row to change the status from Unpaused to Active.
- On the right side of the row, click the Play icon button and select Trigger DAG.
- Click into the DAG name and navigate to the Graph View or Grid View. You will watch the visual pipeline blocks turn light green (running) and then dark green (success) sequentially.
Click on any completed block task, select Log, and you will see your direct Python print messages rendered right inside the Airflow system layout!